Sunday, December 26, 2021

Jsp and servlet Select a data from database


step 1

To Create a Jsp Page for select.jsp

Click the Project Folder-----go to src folder----main folder----web app ---right click the web app---new
----jsp---select.jsp


select.jsp


<%@ page language="java" contentType="text/html; charset=ISO-8859-1"
    pageEncoding="ISO-8859-1"%>
<!DOCTYPE html>
<html>
<head>
<meta charset="ISO-8859-1">
<title>Insert title here</title>
</head>
<body>
<form action="select" method="post">
<input type="text" name="n1" placeholder="Username"><br><br>
<input type="submit"><br><br>
</form>
</body>
</html>


Create a Servlet Page


goto src/main/java then right click new---sevlet---class name---select----finish


select.java


import java.io.IOException;
import java.io.PrintWriter;

import javax.servlet.ServletException;
import javax.servlet.annotation.WebServlet;
import javax.servlet.http.HttpServlet;
import javax.servlet.http.HttpServletRequest;
import javax.servlet.http.HttpServletResponse;
import java.sql.*;
/**
 * Servlet implementation class register
 */
@WebServlet("/select")
public class select extends HttpServlet {

protected void doPost(HttpServletRequest request, HttpServletResponse response) throws ServletException, IOException {
PrintWriter pw=response.getWriter();
try
{
String a=request.getParameter("n1");
            Class.forName("com.mysql.jdbc.Driver");
            Connection con =         DriverManager.getConnection("jdbc:mysql://localhost:3306/example","root","");
            Statement st=con.createStatement();
            ResultSet rs=st.executeQuery("select * from ex where username='"+a+"' ");
           while(rs.next())
           {
            pw.println("the user password is "+rs.getString(2));
}
           

    }
catch(Exception e)
{
pw.println(e);
}
}

}

connect the jar files

right click the project build path----configure build path---add external jars---add mysqlconnector.jar


Note : download the mysqlconnector.jar in google

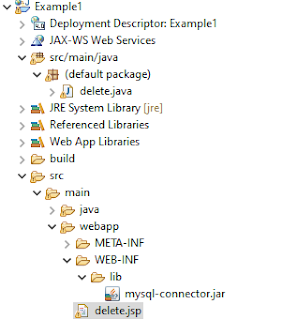
also copy the jar file paste into ----src---main---web app---WEB-INF---lib-----mysql-connector.jar 


Run

Right click the jsp page----run as ---run an server--finish


Jsp Servlet Delete the data in database


step 1

Eclipse---File ----New----Dynamic Web Project----ProjectName----Finish

step 2

To Create a Jsp Page for delete.jsp

Click the Project Folder-----go to src folder----main folder----web app ---right click the web app---new
----jsp---delete.jsp


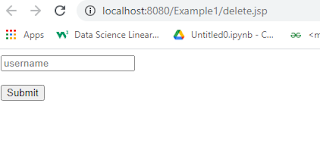
delete.jsp


<%@ page language="java" contentType="text/html; charset=ISO-8859-1"
    pageEncoding="ISO-8859-1"%>
<!DOCTYPE html>
<html>
<head>
<meta charset="ISO-8859-1">
<title>Insert title here</title>
</head>
<body>
<form action="delete" method="post">
<input type="text" name="n1" placeholder="Username"><br><br>
<input type="submit"><br><br>
</form>
</body>
</html>


Create a Servlet Page


goto src/main/java then right click new---sevlet---class name---delete----finish


delete.java


import java.io.IOException;
import java.io.PrintWriter;

import javax.servlet.ServletException;
import javax.servlet.annotation.WebServlet;
import javax.servlet.http.HttpServlet;
import javax.servlet.http.HttpServletRequest;
import javax.servlet.http.HttpServletResponse;
import java.sql.*;
/**
 * Servlet implementation class register
 */
@WebServlet("/delete")
public class delete extends HttpServlet {

protected void doPost(HttpServletRequest request, HttpServletResponse response) throws ServletException, IOException {
PrintWriter pw=response.getWriter();
try
{
String a=request.getParameter("n1");
            Class.forName("com.mysql.jdbc.Driver");
            Connection con =         DriverManager.getConnection("jdbc:mysql://localhost:3306/example","root","");
            Statement st=con.createStatement();
            st.executeUpdate("delete from ex where username='"+a+"' ");
            pw.println("delete successfully");
}
catch(Exception e)
{
pw.println(e);
}
}

}

connect the jar files

right click the project build path----configure build path---add external jars---add mysqlconnector.jar


Note : download the mysqlconnector.jar in google

also copy the jar file paste into ----src---main---web app---WEB-INF---lib-----mysql-connector.jar 


Run

Right click the jsp page----run as ---run an server--finish


Jsp and Servlet Update the data in database


step 1

Eclipse---File ----New----Dynamic Web Project----ProjectName----Finish

step 2

To Create a Jsp Page for update.jsp

Click the Project Folder-----go to src folder----main folder----web app ---right click the web app---new
----jsp---update.jsp


Update.jsp


<%@ page language="java" contentType="text/html; charset=ISO-8859-1"
    pageEncoding="ISO-8859-1"%>
<!DOCTYPE html>
<html>
<head>
<meta charset="ISO-8859-1">
<title>Insert title here</title>
</head>
<body>
<form action="update" method="post">
<input type="password" name="n1" placeholder="old password"><br><br>
<input type="password" name="n2" placeholder="new password"><br><br>
<input type="submit"><br><br>
</form>
</body>
</html>


Create a Servlet Page


goto src/main/java then right click new---sevlet---class name---update----finish


update.java


import java.io.IOException;
import java.io.PrintWriter;

import javax.servlet.ServletException;
import javax.servlet.annotation.WebServlet;
import javax.servlet.http.HttpServlet;
import javax.servlet.http.HttpServletRequest;
import javax.servlet.http.HttpServletResponse;
import java.sql.*;
/**
 * Servlet implementation class register
 */
@WebServlet("/update")
public class update extends HttpServlet {

protected void doPost(HttpServletRequest request, HttpServletResponse response) throws ServletException, IOException {
PrintWriter pw=response.getWriter();
try
{
String a=request.getParameter("n1");
String b=request.getParameter("n2");
            Class.forName("com.mysql.jdbc.Driver");
            Connection con =         DriverManager.getConnection("jdbc:mysql://localhost:3306/example","root","");
            Statement st=con.createStatement();
            st.executeUpdate("update ex set password='"+b+"' where password='"+a+"' ");
            pw.println("update successfully");
}
catch(Exception e)
{
pw.println(e);
}
}

}

connect the jar files

right click the project build path----configure build path---add external jars---add mysqlconnector.jar


Note : download the mysqlconnector.jar in google

also copy the jar file paste into ----src---main---web app---WEB-INF---lib-----mysql-connector.jar 


Run

Right click the jsp page----run as ---run an server--finish


Jsp and Servlet insert data into database


step 1

Create a Data Base

Start---Xampp Control Panel---Start Apache and MySql


step 2

create database 

Query : create database Example;

create table

Query : create table ex(username varchar(50),password varchar(50));

step 3

Eclipse---File ----New----Dynamic Web Project----ProjectName----Finish

step 4

To Create a Jsp Page for register.jsp

Click the Project Folder-----go to src folder----main folder----web app ---right click the web app---new
----jsp---register.jsp


Register.jsp

in register.jsp create a register form design

<%@ page language="java" contentType="text/html; charset=ISO-8859-1"
    pageEncoding="ISO-8859-1"%>
<!DOCTYPE html>
<html>
<head>
<meta charset="ISO-8859-1">
<title>Insert title here</title>
</head>
<body>
<form action="register" method="post">
<input type="text" name="n1" placeholder="username"><br><br>
<input type="password" name="n2" placeholder="password"><br><br>
<input type="submit"><br><br>
</form>
</body>
</html>


Create a Servlet Page


goto src/main/java then right click new---sevlet---class name---register----finish


register.java


import java.io.IOException;
import java.io.PrintWriter;

import javax.servlet.ServletException;
import javax.servlet.annotation.WebServlet;
import javax.servlet.http.HttpServlet;
import javax.servlet.http.HttpServletRequest;
import javax.servlet.http.HttpServletResponse;
import java.sql.*;
/**
 * Servlet implementation class register
 */
@WebServlet("/register")
public class register extends HttpServlet {

protected void doPost(HttpServletRequest request, HttpServletResponse response) throws ServletException, IOException {
PrintWriter pw=response.getWriter();
try
{
String a=request.getParameter("n1");
String b=request.getParameter("n2");
            Class.forName("com.mysql.jdbc.Driver");
            Connection con =         DriverManager.getConnection("jdbc:mysql://localhost:3306/example","root","");
            Statement st=con.createStatement();
            st.executeUpdate("insert into ex values('"+a+"','"+b+"')");
            pw.println("insert successfully");
}
catch(Exception e)
{
pw.println(e);
}
}

}

connect the jar files

right click the project build path----configure build path---add external jars---add mysqlconnector.jar


Note : download the mysqlconnector.jar in google

also copy the jar file paste into ----src---main---web app---WEB-INF---lib-----mysql-connector.jar 


Run

Right click the jsp page----run as ---run an server--finish


MYSQL


Tuesday, May 11, 2021

Matplotlib Tutorial

Matplotlib:

            
                It is a library to create graph plotting in data science.

Import Matplotlib:
                            
                Import matplotlib

This line used to import matplotlib.

Find Version:

                import matplolib
                print(matplotlib.__version__)

This line used to find matplotlib version.

Pyplot:

            Most commonly used utility is pyplot.
            
Import Pyplot:

            import matplotlib. pyplot as plt

This line used to import the pyplot module.

Example:

                import matplotlib.pyplot as plt
        import numpy as np
        xpoints = np.array([0, 5])
        ypoints = np.array([0, 100])
        plt.plot(xpoints, ypoints)
        plt.show()

Output:    


Set Position:

Example:
                import matplotlib.pyplot as plt
        import numpy as np
        xpoints = np.array([1, 5])
        ypoints = np.array([410])
        plt.plot(xpoints, ypoints, 'o')
        plt.show()     

Output:  


      It shows only the position of the x,y points by using 
plt.plot(xpoints, ypoints, 'o')

Multiple Points:

            import matplotlib.pyplot as plt
            import numpy as np
            xpoints = np.array([2,4,7,9])
            ypoints = np.array([6,3,8,1])
            plt.plot(xpoints, ypoints)
            plt.show()

Output:


Default X Points:

            import matplotlib.pyplot as plt
            import numpy as np
            ypoints = np.array([3811057])
                         plt.plot(ypoints)
            plt.show()

Output:


Markers:     

                import matplotlib.pyplot as plt
        import numpy as np
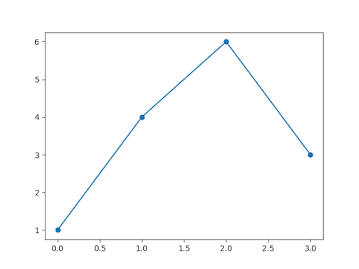
        ypoints = np.array([1,4,6,3])
        plt.plot(ypoints, marker = 'o')
        plt.show()               

Output:


Point the position by the markers code plt.plot(ypoints, marker = 'o')

Marker own symbol:

        import matplotlib.pyplot as plt
        import numpy as np
        ypoints = np.array([1,4,6,3])
        plt.plot(ypoints, marker = '*')
        plt.show()        

Output:


Line Style:

                 import matplotlib.pyplot as plt
        import numpy as np
        ypoints = np.array([38110])
        plt.plot(ypoints, linestyle = 'dotted')
        plt.show()

Output:     


We have more line style like this dashed(), dashdot().


Line Color:

                import matplotlib.pyplot as plt
        import numpy as np
        ypoints = np.array([38110])
        plt.plot(ypoints, color = 'pink')
        plt.show()

Output:


we can use ,ore colors by using plt.plot(ypoints, color = 'pink')

Line Width:

        import matplotlib.pyplot as plt
        import numpy as np
        ypoints = np.array([38110])
        plt.plot(ypoints, linewidth = '25.0')
        plt.show()

Output:

Labels:

        import numpy as np
        import matplotlib.pyplot as plt
        x = np.array([80859095100105110115120125])
        y = np.array([240250260270280290300310320330])
        plt.plot(x, y)
        plt.title("Income")
        plt.xlabel("Average ")
        plt.ylabel("Days")
        plt.show()


Output:


We can add labels like this.

Grid Lines:

        import sys
        import matplotlib
        matplotlib.use('Agg')
        import numpy as np
        import matplotlib.pyplot as plt
        x = np.array([80, 85, 90, 95, 100, 105, 110, 115, 120, 125])
        y = np.array([240, 250, 260, 270, 280, 290, 300, 310, 320, 330])
        plt.title("Income")
        plt.xlabel("Average")
        plt.ylabel("Days")
        plt.plot(x, y)
        plt.grid()
        plt.show()

Output:


We can add horizontal and vertical lines only by using plt.grid(axis = 'x'), 

plt.grid(axis = 'y')

Bar Chart:

        import matplotlib.pyplot as plt
        import numpy as np
        x = np.array(["A""B""C""D"])
        y = np.array([38110])
        plt.bar(x,y)
        plt.show()

Output:


Histograms:

                  import sys
                  import matplotlib
                  matplotlib.use('Agg')
                  import matplotlib.pyplot as plt
                  import numpy as np
                  x = np.random.normal(150,50,230)
                  plt.hist(x)
                  plt.show()

Output:
Pie Chart:

        import matplotlib.pyplot as plt
        import numpy as np
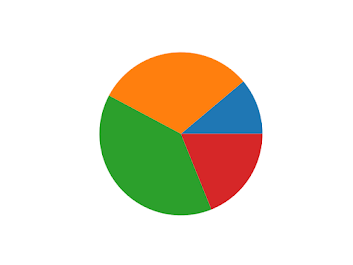
        y = np.array([35252515])
        plt.pie(y)
        plt.show() 

Output:


Python Technical Interview Questions

 1)first non repeating character Malayalam y programming p str = "MalayalaM" a = '\0' for c in str:     if str.index(c) ==...